Allow customers to complete their payments through the payment method they prefer.
Note: Non-primary technicians would not be able to collect signatures or payment.
Collecting Payments
Collecting the payment, even collecting a deposit for work to be performed tomorrow, will cause the invoice to no longer be editable.
You will need to have the customer invoice open:
1. If you do not have it open, you may tap on the Pay button from the invoice screen or the main job screen.
2. Select the type of payment that you will be collecting.
- If you have a periodically billed agreement on the invoice, you will be taken to the Agreement Payment screen.
- Otherwise, you will be taken to the payment collection screen.
Customers can now make multiple payments on one invoice.
Collecting Multiple Payments
Collecting the payment, even collecting a deposit for work to be performed tomorrow, will cause the invoice to no longer be editable.
Once the customer invoice is open:
1. Enter the payment amount in the amount field.
2. Chose the payment method of payment.
Note: The customer has the option for card, check or cash payment.
3. Click confirm payment. If the payment is successful, you will get a screen showing that the payment was successful.
4. Since a partial payment has been made, the user can now make an additional payment.
5. Click Continue to payment to start the next payment.
6. Choose the next payment type. Enter the payment information and click on confirm again to submit the second payment.
7. You will receive a screen showing that the second payment was successful.
Agreement Payment Collection
If an agreement was applied that to the invoice that has a payment type of Periodic Billing, there will be an extra screen where a payment method can be applied to the agreement. This will allow credit cards to be entered from the field onto the agreement without needing to call it into the office. Any deposit for the agreement will be collected with the rest of the invoice balance and this card is not necessarily used for that.
If your system does not have a credit card processor enabled or if the agreement is one of the following types, this screen will not appear:
- Charge per visit.
- Prepaid.
- No charge.
You will see the following fields in the Payment Summary:
- Payment amount.
- Frequency.
- Agreement Total and Deposit.
If you do not wish to add a payment to the agreement or if the payment is not a credit card, you may tap the Proceed to pay button to continue.
To add a credit card to the agreement:
1. Tap on the Add card button.
2. You will have the option to select to use the same card that will be used to pay the invoice or use a different payment. If you want to use a separate credit card, tap on the checkbox.
3. You can change the Bill Start Date. The Bill Start Date options will pull based on what days your office has selected and will automatically be selected for the next available date. You can choose to change this to be a future date.
4. Enter the card information if you are going to use a separate credit card. If you are going to use the same card as the invoice payment, simply tap the Proceed to pay button to continue.
Use a Separate Credit Card
If you choose to enter a separate credit card, you can choose to enter the credit card via manually entering the card or by swiping the card.
Manually Enter a Card
You can manually enter the card details:
a. Enter the card details:
- Credit card number
- Expiration date
- Security Code
b. Tap the Authorize Button
Authorize card through Swiper
You can choose to use the credit card reader to enter the card number.
1. Tap on the "Use card reader" button.
2. Tap on the option to Scan for card reader.
3. Once the card reader is found, swipe or insert the card.
4. The card will be processed, and if it succeeds, you will be taken to the authorization approved page.
Card is Authorized
1. If you have manually entered the credit card or used the credit card reader to collect a different payment, you will see confirmation that authorization was successful.
2. Tap on the Proceed to pay button to continue to collect payment for the invoice.
Payment Collection
Collect Deposit vs Include Account Deposit
In addition to paying the full invoice, Successware Mobile also allows techs to increase the total payment by Collecting a Deposit for future work, or lowering the total payment by Including an Account Deposit that was previously paid by the customer.
When to Collect a Deposit
The Collect Deposit option in Successware Mobile is primarily used when a tech is planning to revisit a job site the next day and wants to collect a deposit for that future work. Deposits can also be collected for sales jobs.
Note- If a salesperson or tech does accept a deposit for work, the invoice will no longer be editable.
If you do collect a deposit in the field, your office should post the invoice, and create a new one. That way, you can edit the new invoice while performing the job, if needed.
Rather than collecting a deposit in the field, we often recommend having someone at the office take a deposit for the work. That way, it can be added as a deposit on the customer's overall account, which can be tied to the job. Otherwise, the deposit will be considered a partial payment for the job, and the invoice will no longer be editable.
Selecting the Include Account Deposit
If you select Include Account Deposit, a deposit that was previously made by the customer can be subtracted from the total invoice due.
1. A pop-up will appear asking you to select the deposit, in case more than one deposit has been made.
2. Tap on the deposit.
3. Tap Save.
If you select the incorrect deposit, you may tap on the deposit amount to the right of the checkbox to reselect the deposit.
Selecting the Include Account Balance
If you select Include Account Balance, the full account balance will be included with the invoice. If the balance is negative, it will subtract from the invoice balance reducing what the customer owes.
If the “Include Account Balance” is checked, the account balance will show up on the invoice.
Steps to Collect Payment
1. The payment screen will appear with the invoice total selected, and the payment amount field filled out with that invoice balance.
2. You may choose to select either an individual deposit or add the balance of the customer’s billing account. Simply check the appropriate checkbox to add the balance. You may only choose to select one option at a time.
Note: The customer’s Account Balance option will only be available if the office enables this from the admin website.
These options will be greyed out if there is no account balance or no deposit to apply respectively.
3. You will need to fill out the payment amount.
By default, it will be the full amount of the invoice or the value of the invoice plus the account balance or the value of the invoice minus the account deposit depending on which checkbox is checked. If you do not need to collect a payment, simply choose the payment method “None”.
4. If you want to easily choose the full amount of the invoice or the invoice with the account balance, simply click on the button.
5. Select the type of payment that you will be collecting.
- Credit Card
- Check
- Cash
- Other
- None
- NOTE: if you selected to record a credit card to an agreement using the same card as the invoice, you will only be able to select Credit card.
Charging the Card Manually
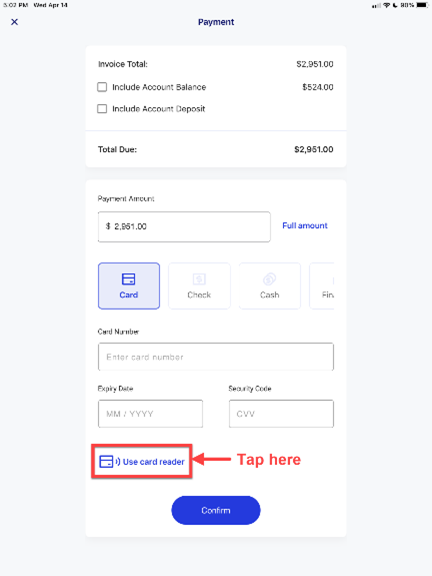
If your company is using Successware Payments to process credit cards, you will be able to enter the credit card number, expiration date and security code on this screen. This will charge the credit card.
1. Make sure the “Card” option is selected.
2. Enter the card information:
a. The card number.
b. The card expiration date.
c. The card 3-digit security code.
3. Tap “Confirm”.
4. Wait for the payment confirmation.
5. Tap “Done”.
Pay by Card Reader

1. Make sure the “Card” option is selected.
2. Tap the card reader button.
3. Click the “Scan for card reader” button.
4. Make sure your device has turned on the Bluetooth.
5. Click OK button to grant the Bluetooth permission to Successware app (Android should also open location permission).
6. Insert or swipe a card when the card reader is ready.
7. Wait for the payment confirmation.
8. Tap “Done”.
Processing Cards Outside Successware Mobile
If your company is not using Successware Payments to process credit cards, you will be able to enter the credit card information on this screen. This will not charge the credit card and is only used to record that the card was charged through a different processor.
1. Make sure the “Card” option is selected.
2. Enter the card information
a. The card type
b. The cardholder’s name
c. The last 4 digits of the card
d. The card expiration date
e. The approval code
3. Tap “Confirm”.
4. Wait for the payment confirmation.
5. Tap “Done”.
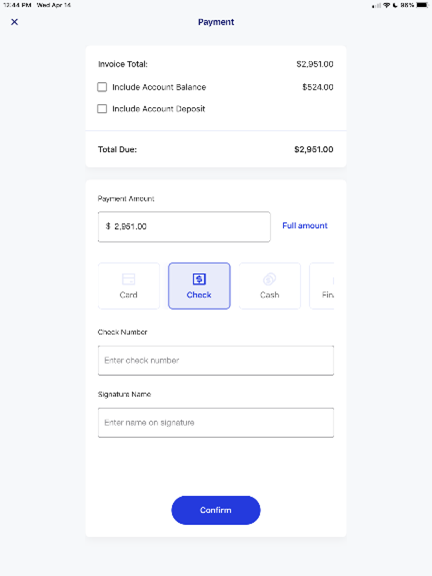
Charging by Check

1. Make sure the “Check” option is selected.
2. Enter the check information.
a. The check number.
b. The name of the signer of the check.
3. Tap “Confirm”.
4. Wait for the payment confirmation.
5. Tap “Done”.
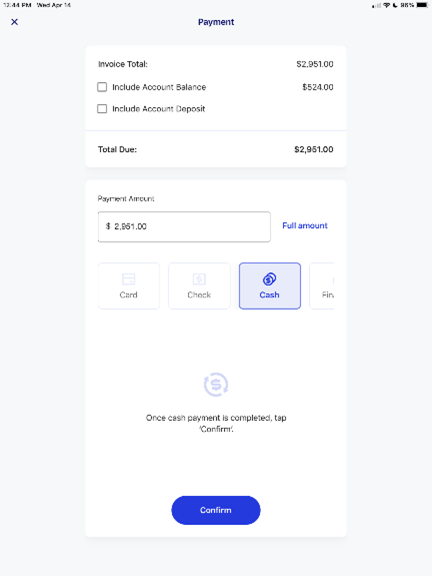
Charging by Cash

1. Make sure the “Cash” option is selected.
2. Tap “Confirm”.
3. Wait for the payment confirmation.
5. Tap “Done”.
Charging by an Alternate Form of Payment
You may have a customer use a payment other than Credit Card, Check, or Cash. You will be able to enter these through the Other option. The available payment methods are determined by your office. Also, performing an Other payment does NOT process the payment, it only records the payment information and must be processed outside of Successware Mobile.
1. Make sure the “Other” option is selected.
2. Select one payment method from the dropdown list.
3. Fill in payment reference.
4. Tap “Confirm”.
5. Wait for the payment confirmation.
4. Tap “Done”.
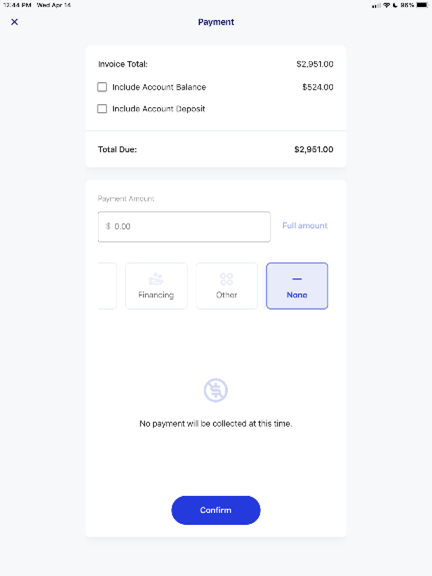
Collecting No Payment at time of service

1. Make sure the “None” option is selected.
2. Tap “Confirm”.
3. Wait for the payment confirmation.
4. Tap “Done”.
Collecting Payment Signature
Collect the Payment Signature to record that the customer is satisfied with the work done and has agreed to pay the amount on the Invoice.
Steps:
1. After tapping Done on the payment confirmation screen, you will be taken to the receipt with the payment signature field ready to collect the signature.
2. Have the user sign for the payment and approval.
3. Tap confirm.
There may be times when you close out of the payment signature before collecting the signature. You may have done this if the notes needed to be changed. If you need to get back to the signature.
1. Tap the “Sign” button on the Job screen or on the Invoice screen.
2. Scroll to the bottom of the receipt.
3. Tap on the “Sign here” space under the payment signature field.
Receipt
Once the payment is recorded a receipt will be visible.
At the top of the invoice, you will see the total remaining balance of the customer’s account (not just the invoice).
If the customer had a previous Account Balance of $10,000, an Invoice Total of $500, and a Payment Amount of $1,000, the Remaining Balance will be $9,500.
This Remaining Balance due will include the Account Balance if the “Include Account Balance” check box was checked. If it was not checked, it will only include the invoice balance.
If a credit card was collected for an agreement, you will see a section for the agreement and payment summary.
At the totals section of the invoice, you will see:
- The Subtotal
- The Discount
- The Tax Amount
- The Invoice Total – the subtotal plus tax and discounts
- The Account Balance – the balance of the customer’s account prior to the invoice
- Total Due – the total of the invoice and the account balance added together
- Payment Amount – The payment that was collected at the time of service
- Balance Due – The customer’s Account Balance that remains after the invoice is added and payments subtracted.
Sending the Receipt
You will be able to send the receipt to the customer. This receipt will automatically appear in the customer media as a PDF so it can be referred to on future jobs. If your office has the “Copy to Address” feature setup in the Successware Mobile Admin site, a copy of the invoice will be sent to them as well.
To send the receipt:
1. With the invoice open, tap the Email button.
2. When the email receipt is open, type the customer’s email if it is not already entered or if they want to send the receipt email to a different email address.
3. If they changed their email address and you need to update it, tap the checkbox to update the customer record.
- Once the email receipt sends successfully, you will be taken back to the invoice and you will see a pop-up telling you the email was sent.
Once the email is sent there will be an indicator on the Job and Invoice pages to tell you that the PDF version of the invoice has been sent.
Looking for a more interactive course on Payment options in Successware Mobile? Check out our Learning Management System (LMS)! Our courses are available to all Successware users. If you don't have a sign-in for our LMS, contact us at training@successware.com for a free account.